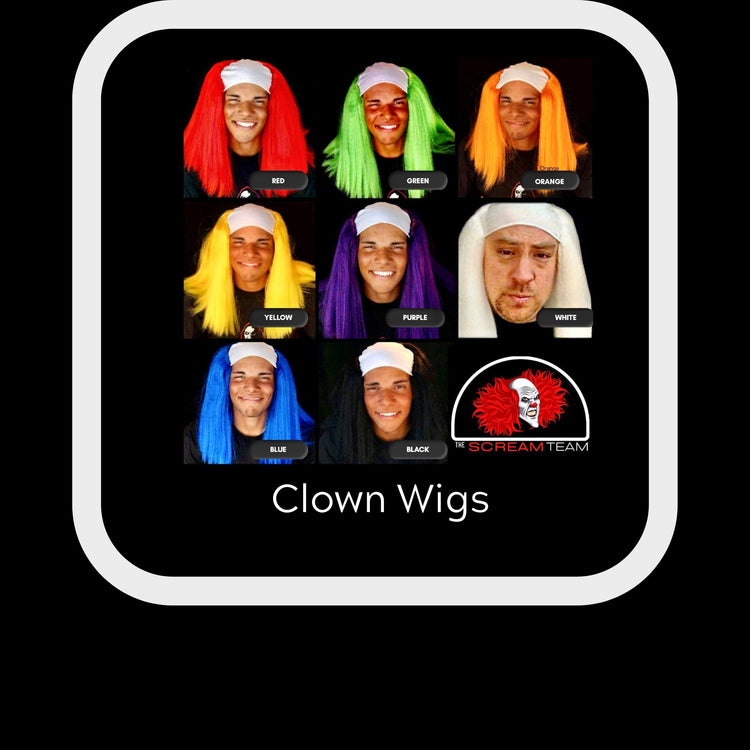
Collection: Wigs | Deluxe Bald Clown Wig | The Scream Team | 8 Awesome Colors
Deluxe Bald Top Clown Wig in 8 great color choices!

-
Bald Top Deluxe Clown Wig -from The Scream Team | Makeup FX for Halloween, Haunted Events, Cosplay, Conventions
5.0 / 5.0
(3) 3 total reviews
Regular price $ 44.95 USDRegular priceSale price $ 44.95 USD
New to Foam Latex Appliances? Start Here First
WELCOME TO YOUR NEW FACE
Congratulations—you now have a motion-picture-quality foam latex prosthetic appliance from The Scream Team.
Unlike a conventional mask, a foam latex appliance is applied directly to your skin. It moves with your expressions, letting you breathe, eat, drink, and perform more naturally while becoming your character.
SAFETY FIRST
• These products and instructions are for entertainment use only.
• Do a small test patch with your selected adhesive and makeup 24 hours before application. Use an inconspicuous area, such as the inside of the elbow.
• Follow the manufacturer’s directions for all adhesives, cosmetics, and removers.
• Work carefully around eyes. Keep adhesive and remover out of eyes.
• NEVER use superglue or any cyanoacrylate adhesive on skin or foam latex.
• Each appliance is individually crafted. Slight differences in color, texture, edges, or small air pockets are normal.
BEFORE YOU START
Gather your supplies:
• Your foam latex appliance
• Adhesive: spirit gum, liquid latex, medical/toupee tape, medical adhesive, or prosthetic adhesive
• Cotton swabs or cotton balls
• Small makeup sponges and brushes
• Rubber Mask Grease / Latex Mask Cover for your base color
• Loose powder, cornstarch, or non talc baby powder
• The correct remover for your adhesive
• Mild dish soap or baby shampoo for cleaning
Inspect your appliance before applying it. Some pieces may have a little extra foam around nostrils, lips, eye openings, hairline, or edges. Gently remove excess foam from the BACK of the
HOW TO APPLY YOUR FOAM LATEX APPLIANCE
1. Start with a clean, dry face.
2. Test the fit before using adhesive. Place the appliance over your face and make sure the nose, eyes, nostrils, mouth, chin, and hairline are aligned.
3. Begin at the nose. Apply adhesive to a small area, position the appliance over your nose, and gently press it into place. Once the nose is secure, check the overall fit.
4. Work outward in small areas. Attach the rest of the appliance from the center toward the edges. Do not apply adhesive to huge areas at once.
5. Make sure all intended skin-contact areas are attached. Loose areas reduce facial movement and can allow perspiration to collect underneath.
ADHESIVE OPTIONS
Spirit Gum: Apply a small amount to the skin, pat it with your fingertip until it becomes tacky, then press the appliance into place.
Liquid Latex: Apply a thin coat to both the appliance and the matching skin area. Let both sides become almost dry and clear, then press together. Keep it out of hair, eyebrows, and eyelashes.
Toupee or Medical Double-Sided Tape: Apply appropriate flexible tape to the appliance, clean and dry the skin, remove the backing, and press on in small sections.
Medical Adhesive: A stronger option that is immediately tacky. Apply sparingly and position carefully, because there is less time to adjust.
Prosthetic Adhesive / Pros-Aide: Apply thin coats to both surfaces, let them become nearly dry, and press together. Read removal instructions before choosing this method.
BLENDING EDGES AND COLORING
Thin edges help the appliance look like part of your face. For additional blending, use a small sponge to dab a THIN layer of liquid latex or eyelash adhesive across the edge and about 1/4 inch onto the skin. Let it dry completely, then lightly powder any tackiness. Avoid getting liquid latex in hair, eyebrows, eyelashes, or eyes.
Use Rubber Mask Grease or Latex Mask Cover for the base color. Avoid conventional petroleum-based makeup directly on foam latex.
1. Apply a thin base color using a sponge or fingertip. Start light—you can always add more.
2. Blend makeup past the appliance edge and onto your own skin, especially around cheekbones, temples, jawline, hairline, and neck.
3. Add shadows with colors a couple of shades darker than the base. Put shadows into wrinkles, recesses, under cheekbones, and along the jaw.
4. Add highlights with colors a few shades lighter than the base. Put highlights on raised areas.
5. Soften hard makeup lines by gently patting with a fingertip or sponge.
6. Optional: Stipple gently with a sponge to add skin texture and soften transitions.
4. Finishing Your Look
FINISHING YOUR LOOK
Make up any visible skin, especially your neck and hands, so the character looks complete.
Set the makeup with loose powder, cornstarch, or baby powder. Load a powder puff, then PRESS powder onto the face. Do not wipe or rub, because that can smear the makeup. Brush off extra powder after everything is set.
For a slight skin-like sheen after powdering, use a tiny amount of water-based K-Y Jelly. Do NOT use petroleum jelly or other petroleum-based products—they can damage foam latex.
5. Removal
REMOVAL
Take your time. Start at an upper edge and work gently downward. Never pull quickly.
Spirit Gum: Use rubbing alcohol on a cotton swab or cotton ball along an edge until it lifts. Work downward slowly.
Toupee Tape or Liquid Latex: Start at an upper edge and gently peel downward. Remove tape from the back of the appliance slowly and carefully.
Medical Adhesive or Pros-Aide: Use the proper remover recommended for that adhesive. Work slowly from an upper edge. If mineral oil was used, wash the appliance promptly.
6. Cleaning and Storage
CLEANING AND STORAGE
1. Wash gently with warm water and mild dish soap or baby shampoo.
2. Gently squeeze soapy water through the appliance until the water runs clear.
3. Do not wring or twist the foam.
4. Press the appliance between dry towels to remove moisture.
5. Let it air-dry completely for several hours or overnight.
6. Lightly powder the back if it feels sticky.
7. Store the dry appliance in an airtight bag or container in a dark